Slipcover for Ikea Poang Kid Chair

October 21, 2015

This isn’t a tutorial because I followed this one from Just the Bee’s Knees almost exactly, so go over there and follow her fantastic directions.  I skipped the piping and used indoor/outdoor fabric b/c I love using that with little ones around.  Things wipe off SO easily.  It’s like magic.

These slipcovers were super duper easy.  (I made two.)  It was another one of my maternity leave projects that I completed shortly after I gave birth and ended up using it for Z’s monthly photo.  I love looking at her progression from not being able to support her head to climbing in and out of the chair like a big girl.

poang


More From My Blog Hiatus – Spice Jars

October 21, 2015

I did a lot of organizing during my maternity leave since I only had one baby 😛 this time.  I installed laundry shelving the week after I gave birth, considered installing moulding, but instead turned to my disaster of a spice cabinet.  I buy most of my spices in bulk in small amounts so they stay fresh.  So, I wanted small jars – 2-3 ounces each.  I read that opaque ones are better for preserving your spices, but since mine are in a dark cabinet, I thought glass would be fine.

I like the oval ones from Crate and Barrel because they use space efficiently, but they were only available online.  I didn’t like the frosted label part of the Ikea Droppar ones, though now in retrospect I kind of like them.  I ended up ordering these from Cost Plus World Market because I had free shipping and liked the pop of color.  I also picked up a couple turntables at the Crate and Barrel store (Copco brand – they aren’t on the website anymore, but are available on Amazon) so I could get to all the spices, something that was very challenging before.  I originally used paper labels, which was fine, but then I got this sweet label maker.  It’s not the highest quality machine – I had to get a replacement after it stopped cutting properly, but I love the retro look.  The click sound is very satisfying.  There are still some spices and seasonings that are just too big for spice jars (hello Costco), but overall, it’s a vast improvement.

20150529_204549 - Copy 20150529_204622 - Copy

spice jars 20150529_231819 - Copy


Quick Update and Backpacks

October 1, 2015

Are you wondering where I went? Did you think I stopped doing fun projects and started going to sleep earlier?  Well, I’m happy to report that I have continued adding and checking off things on my project to do list, but have been terrible about blogging about them.  I’ll be posting about them soon … hopefully!  In the meantime, I made a lot of backpacks during my blog hiatus – 5 to be exact!  I made a few for birthday presents and then new ones for my twins that are bigger than the ones I made before.  I even figured out how to add pockets!

bunny backpacklining 2 duck backpack lining


lion backpacklion backpack


20150930_23322620150930_233247

20150930_23331320150930_233325

20150930_23335520150930_233344


DIY pillowcases

May 31, 2015

My kids’ pillows always end up out of their pillowcases by morning, so I decided to make them some fun envelope style pillowcases.  Fleece was also on sale at Joann’s for 60% off, which helped motivate me to get my sewing machine back out after a long hiatus.

(Please excuse the terrible photo quality and angles.  It was nighttime and I only had my cell phone camera, but you get the idea!)

From this cute fabric

fabric

to these cute pillows that won’t fall out by morning.

pillows

Note: There’s another way to make envelope pillows where the fold is on the inside, but I prefer the look of this way.  Plus, my kids are less likely to stuff random things inside when the envelope is the way I describe below.

Step 1: Measure your pillow and cut your fabric

Each pillowcase takes 1 yard of fabric.  I discovered there wasn’t really a standard size pillow, so I measured the ones that my kids currently use, which used to be on our bed and are a different size than our new ones.  Weird, right?  Any way, the ones on their bed are about 17.5″ x 26″.

After washing, the fleece I bought was about 40″ wide and 35″ long.  I folded this in half hot dog style (yes, I used to teach middle school) and cut 2″ off the selvedge edges so the fabric was 36″ wide.  Then I trimmed the bottom of the fabric so it was 34″ long.

Now, cut 7.5″ on the folded seam and cut out that rectangle, so one side is 26.5″ long.

Step 2: Hem

On the shorter side, cut 1/2″ on the half seam line and hem this.  On the longer side, fold over 1/2″ and then another 1/2″ so that the cut edge doesn’t show.  Hem this.  At this point, the shorter side is 26″ long and the other side is 33″ long.  One of the great things about fleece is that it doesn’t fray, so you don’t have to worry about serging or zig zag stitching the raw edges.  I do like the look of a finished edge on the part of the envelope that will show.

step 2

Step 3: Fold and Sew

Fold the long side up so both sides are even.  You should have a rectangle that is 36″ x 26″.

step 3a

Then fold this in half right sides together so you have a rectangle that is 18″ x 26″.  Now you’re going to sew a 1/2″ hem around 3 sides (not the side with the envelope opening).  Yes, you do have to hem the side that was folded because this keeps in the envelope in.  Your pillowcase is now 17″ x 25.5″, which is a tiny bit smaller than the pillow so it fills out nicely.

step 3b

Step 4: Flip and Stuff

Flip your pillowcase rightside out and put the pillow in.  Ta da!

finished pillow


I’m back (almost)!

May 26, 2015

I can’t believe it’s been so long since my last post.  I  gave birth in October and Z is such a chill baby, so I was out and about a lot, building shelves, planting a garden, taking a Coursera class, doing Zumba, so blogging kind of slipped my mind.  But, the good news is that I have a lot of DIY on my to do list, so hopefully I’ll be posting some tutorials soon.  Teaser – think placemats, outdoor reupholstery, coasters, pillowcases, bags, skirt, ironing board cover, … Phew, these should take me into 2016!


DIY Christmas Stockings

December 7, 2014

stockings 2

Sorry for the long absence, but I had a baby!

I am not going to post pictures of my process because this tutorial from Sew Like My Mom (what a great blog name!) does a really good job of that.  I tried to wing it on my own before finding that tutorial and had a few fails where my stocking was sewed together or there were two stockings like conjoined twins.  Do exactly as she says and it will turn out great.  Don’t think or ask questions – I didn’t understand the ribbon placement at first, just went with it, and it turned out perfectly.

Since the tutorial didn’t have measurements, the ones I used to have a final stocking that was 6″ at the top, 9″ at its widest point, and 16″ long were:

  • 2 – 10″x17″ outer fabric
  • 2 – 10×17″ inner fabric
  • 2 – 7″x8.5″ cuff fabric (or you can use 4 – 7″x4.5″ that you hem together)

The only tips I have to add are:

  1. Make a pattern of your stocking on paper.  Then trace around it adding 1/2″.  Then use that piece of fabric as your template to cut the rest of your pieces.  I found this easier than making a template that accounted for the 1/2″.
  2. Definitely use a bigger hem for the lining like she suggests.  It makes it really easy to fit the lining into the stocking later.
  3. Don’t leave your opening at the toe.  It’s much easier to leave your opening in an area that is straight so when you flip it right side out and sew it, it’s just a straight line instead of around a curve.  I left my opening just above the heel.
  4. After you turn the stocking right side out, iron it.  It’ll make it much easier when you are fitting the lining in.
  5. If you are trying to use up scrap fabric for the cuff, you can use four pieces that are 7″x4.5″ each.  Sew two together for each side.
  6. If you are sewing in trim to hang under the cuff, you need to use four pieces to make the cuff instead of two (see #5).  Sew the trim in between the two pieces, BUT see #7.
  7. It’s much easier to use a glue gun to attach pom pom trim after you’re done sewing than to sew the trim in.
  8. If you want to add initials or names, adhesive felt is great.  Print your names on paper, then trace them with scissors or a exacto, and stick on your stockings.

Have fun!


DIY Lined Back Tab Curtains

September 8, 2014
Recently, fabric.com had a sale on Premier Prints fabric in advance of Premier Prints’ permanent retail price increase.  I couldn’t resist and bought 5 1/2 yards of Zippy (big zig zags) Slub (looks like linen) in Navy to make new living room curtains.  zippy slub navy
There wasn’t anything seriously wrong with my living room curtains, but I couldn’t resist the easy room refresh, so I decided to make new curtains and fix a few things that did irk me about my old curtains.  Here was my list of “complaints”:
  1. They didn’t have back tabs, so they didn’t drape exactly how I like (I didn’t know what back tabs were when I made them).
  2. You could see the lining from the sides because the fabric and lining were the same width.
  3. The rod was too close to the window.
  4. The rod was too narrow.
  5. The rods had no finials.

Useful measurements

  • Curtain fabric: 55″ wide, including selvedge) x 100″ (2.75 yards plus an extra inch)
  • Lining fabric: Cut to 53″ x 100″
  • Each finished curtain: 53″ x 93″.

Step 1: Sew sides

Line up the right sides of the fabric and sew a seam down one side.  Then line up the other side and do the same.  Since the lining fabric is 2″ narrower, you need to move the fabric over to line up the 2nd side.

Flip your “tube” right sideout and iron both sides so that the side borders are the same width.  (Sorry, I am having trouble embedding this photo, but it’s pretty straightfoward.)

Step 2: Sew top, including tabs

Since my fabric is patterned, I needed to make sure the pattern started at the same place on both curtains so they’d look exactly the same.  To do this, I folded the top over about 4″ and then matched where that same pattern fold was on the 2nd curtain (about 6″).  Iron seams.

Iron a seam on the unfinished edge.

Cut 11 pieces of ribbon (about every 5″ apart).  The length depends on how wide your panels are.  Sew the wrong side of the ribbon ribbon to the right side of the fabric along the unfinished edge – both right sides are facing you.

curtain tab bottom

Fold the other end of the ribbon under and sew just below the 4″ seam.  Make sure you don’t sew it too close to the ironed seam because you don’t want the ribbon to show at all from the front.

curtain tab top

Fold 4″ seam over and unfinished edge seam under.  Flip to front of curtain and stitch across bottom seam.  This is the only seam that shows from the front.
tabs
Do the same thing with your second curtain making sure everything is the same because when they’re side by side, you’ll be able to tell if your two panels don’t match!

Step 3:

Hang your curtains up and mark where they’ll just hit the ground.  you can measure 93″ from the top, but I found actually hanging the curtains on the rod more accurate because the curtain may hang differently depending on where you put the tabs.

Iron bottom seam and raw edge.  Fold raw edge over and hem bottom with a straight stitch or if you want to be fancy, use a blind hem stitch at the bottom and fold in each end to make a small triangle.  (If you don’t know how to do this, google it.  It’s really not that hard and a good stitch to learn.)

Ta da!

curtains

(I know, I know.  Now that the curtains look really nice, our couch looks even worse.  It’s like when I painted the front door and then we had to paint our entire house!)

Budget for Curtains

  • Premier Prints Zippy Slub Navy, 5.5 yards – $40
  • Ikea Bomull, 5.5 yards – $11
  • 1 1/2″ wide ribbon – $1.50
  • Needles, thread – had these – $0
  • I purchased a new sheer curtain because my kids ripped the old one and buying one was the same price as making my own.  Ikea Vivan – $9.99
  • Total: about $63

Budget for Hardware

  • Curtain Rod for curtain – Ikea Hugad $5.99
  • Curtain Rod for lining (I could have spraypainted my gray one, but since they’re so cheap at Ikea, I just bought a new one) – Ikea Racka – $4.99
  • Curtain Brackets (The Hugad was too big for my old bracket, so I had to get new ones) – Ikea Betydlig- $1.98 x 3 = $5.94
  • Total: about $17

So overall not the cheapest makeover, but one that I hope will last a long time and way cheaper than buying such long curtains retail or from Etsy.


Lifestyle Blogs

July 22, 2014

I’m a bit confused by lifestyle blogs/curated shopping blogs in a similar way that memoirs by “average” people confuse me. I think Gwyneth Paltrow’s Goop is the most famous and probably most ridiculed lifestyle blog, but Blake Lively just launched Preserve and Heidi Swanson, whose recipes I love has one called Quitokeeto.  The general idea behind these blogs is you like me/my life, so you’ll like what insanely expensive things I tell you to buy and I’ll make money when you buy a $58 jar of honey or a $495 skateboard.  I guess they make more money if you buy more expensive things, but wouldn’t more people buy more things if they weren’t insanely expensive?  Probably if you’re really wealthy, you just want someone to tell you what to buy, but then wouldn’t you have a personal shopper?  See, it’s very confusing!  (My comparison to memoirs is when people write about their average lives without demonstrating any particular insight.  I don’t understand why these memoirs get published!)

Any way, I was joking with some friends about starting my own lifestyle blog and then I thought it would actually be funny to make the “normal” person version of it, so here’s my first curated list of must haves for July 22:

  1. Nutella – You eat kale and quinoa, but sometimes you want a creamy, chocolately, hazelnuty treat and you know what, it’s okay to consume palm oil and lecithin once in a while.  Nutella is especially delicious in a sandwich with peanut butter and bananas.  Delicious!
  2. Leahco Back ‘N Belly pregnancy pillow – Are you pregnant?  You need this.  You can suffer on without it, but once you try it, you’ll be hooked.  It’s amazing, though be prepared – it takes up 70% of the width of your bed, but it’s worth it.  Toddlers also love laying in it.
  3. Reef Flip Flops – They’re the best.  I wear the men’s ones even though I’m not a man.  They’re awesome.  You can walk in them for days.
  4. Costco croissants – Seriously, they are good straight out of the package, but even better when toasted and they’re made with real ingredients like butter and flour.  Plus, they are SO affordable.  Flaky deliciousness.  You could refi your house and get some $58 honey to spread on these.  That would be heavenly.
  5. Mayordomo Chocolate – Okay, this is a little bougie, but only because it’s hard to buy in the US, but seriously, Mexican hot chocolate made with Mayordomo chocolate is SO good.
  6. Craigslist Free Section – I know, technically, you can’t buy this, but if you’ve ever read my blog before, you know I love CL.

Stay tuned for more plebian curated shopping lists in my next lifestyle post.


DIY Upholstering Armchairs

July 10, 2014

I’ll admit that I’ve been wanting to tackle a chair upholstery project for a while, but didn’t really want to spend money on a chair when I wasn’t sure if it would turn out well.  (That is pretty much my MO when it comes to upholstery!)  I actually almost bought a wingback recliner for $40, but got cold feet.  So, imagine how excited I was to get two armchairs for free from someone on Craigslist.  It looks like they gave up on the same upholstering project I was about to undertake.
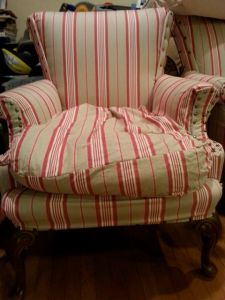
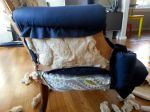
BEFORE:

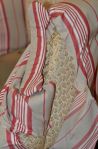
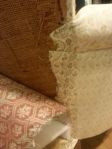
It doesn’t actually look too bad in this photo, but the fabric wasn’t securely attached anywhere and the upholstery tacks were also loose.

2013-10-22 22.04.02

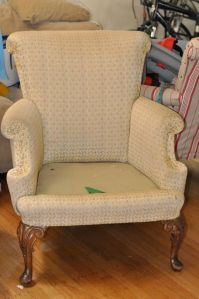
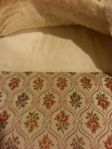
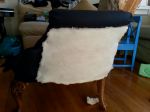
Under that was this gorgeous fabric that I think a professional “installed”.
DSC_0175

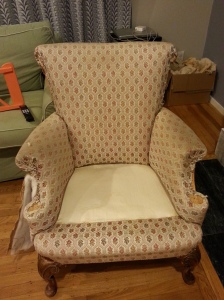
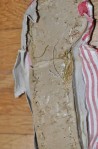
And under that was the original fabulous floral fabric.  Who knows how long that’s been there?!
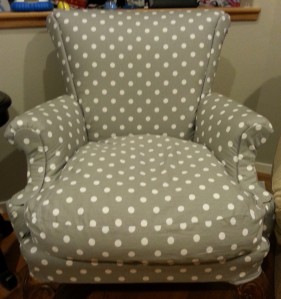
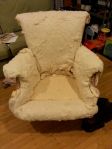
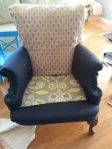
20140616_210232


AFTER:

20140709_205937

There are lots of great how to’s online, including this one and  this one, but I couldn’t find any that really explained how to do the seat deck (the part under the cushion) that attaches to the lip (material in front on the bottom), so I found this posting to be helpful in understanding and visualizing what I was working with.

The general consensus on the internet is that upholstery isn’t particularly hard, but takes a ton of time and patience.  The general attack plan, taking pictures all the while, is take the chair apart, keep and label all the pieces, use them as patterns, reassemble in the reverse order.  Many people say an electric staple gun is really helpful, but I didn’t mind using my manual one.

My chairs had 3 layers of fabric and I think that a professional upholstered the chair before the person I got it from because it seemed like that material was attached between wood, indicating the whole chair had been taken apart, not just the fabric being removed.  I decided that I would just remove 2 layers and leave the original floral fabric.

Materials (for each chair)

  • 3 1/2 to 4 yards of fabric – I think I would have made it with 3 1/2, but I got 4 to be safe.
  • Tack remover
  • Staple gun
  • Upholstery staples – size dependent on your chair
  • 1 1/2 yards of Pli-Grip (I didn’t use all 1 1/2 yards.  You don’t need this if your existing pieces are reusable.)
  • Hot glue gun and glue

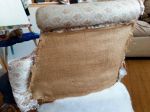
Step 1: Deconstruction

I took a million pictures while deconstructing the chair to increase the chance I’d be able to put it back together.  Here are some to give you an idea of how tedious it was.  I think it took 6-8 hours.

DSC_0173DSC_0171DSC_0163

2013-11-04 21.05.11  2013-11-04 21.33.25 2014-01-04 14.21

2013-11-05 21.50.322013-11-10 19.59.55 2013-11-10 19.59.37

I labeled the fabric pieces as I went so that I could use them as pattern pieces and also kept a running list of what I took off in order so that I could reverse it when it came time to reassemble.  Here’s the list for reassembly:

  1. Seat Deck (requires sewing)
  2. Inside Arms
  3. Front Back
  4. Outside Arms
  5. Back Back
  6. Front of arms (4 pieces)
  7. Underchair fabric
  8. Cushion cover (requires sewing)

I purchased this tack remover, which is optional, but for $2.40 ($3.99 with 40% off), it’s not really optional at all.  I was surprised that very few sites I looked at re DIY upholstery mentioned this tool or anything like it.  This saved me hours and hours and a lot of emotional stress.

DSC_0179

These were some areas that made me nervous about reconstructing:

  • The arm parts had this weird metal thing sticking out and I wasn’t sure how it worked.  (I ended up hammering it down and not using it.)
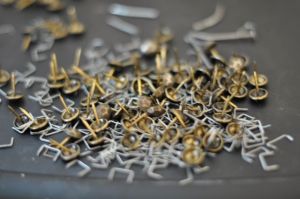
  • The parts with tacks looked like medieval torture devices and some of the metal tines got stuck in the chair, so I thought I might have to replace them.  (I was able to reuse some and replace some with pli-grip.)
  • The layered cardboard that attaches to the arm areas was cracked and I didn’t know where to get a replacement. (I got chipboard from an art store.  It worked great.)

The lesson here is don’t be scared.  You’ll figure it out.  Also, if you get stuck, there is this amazingly generous guy in Cape Cod who is a profession upholsterer who answers questions!

Step 2: Reconstruction

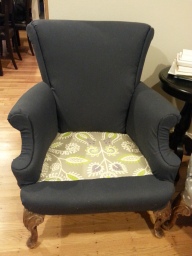
I wanted to reassemble the chair as soon as I could so I wouldn’t forget how it all went together.  Also, it seemed that after taking it apart, putting it together would be much faster, more fun, and more satisfying.  It’s kind of like moving.  Packing all your stuff up sucks, but it’s pretty fun to unpack and find new places for everything in your new house.  Though I had the best of intentions, this project dragged on for a while.  I did the first chair and wasn’t that thrilled with the navy blue fabric I picked.  So then it took me a while to pick a new fabric and get started on the 2nd chair.  The good news is that the 2nd chair was way faster because I knew what I was doing.  I feel really to tackle that wingback recliner now!  (Sorry T :P)

Make sure you move the batting so you can pull the fabric through and staple it to the wood frame.  Use new batting if necessary to provide a smooth base under the fabric.  It was easy enough to get the main pieces down, but the front arm areas were challenging because I wasn’t planning on using nailhead trim to cover up my staples, so I had to be very careful about staple placement.

When it came to the original metal tines, I tried it and it seemed tight enough even with a couple missing pieces.  There were some that didn’t have enough tines left, so I used Pli-Grip (google it for instructions).  I didn’t love it because it was hard to staple properly, but it did the trick.

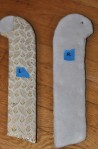
I ended up using chipboard instead of the original front arm cardboard.  I cut two pieces of the same shape in a thinner and thicker piece of chipboard.  I put nails through the thin piece, then glued the thicker piece on top with hot glue.  Then I glue the fabric over that.  You can also use staples if your use shorter staples, but I didn’t want to buy a whole package of staples just for this.  The hot glue worked great.  Then I carefully hammered the nails into the chair.  The thicker chipboard kept the nails from poking through the fabric.  You can also use some hot glue to help hold the edges in place.

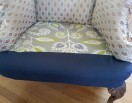
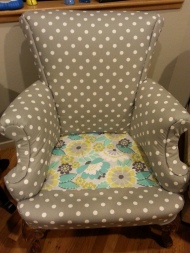
Here are some pictures of the navy chair (1st one) and then one of the gray polka dot chair (2nd one), which is way cuter.  I might redo the navy one so that they match because apparently I like to makeover my furniture twice (evidence)!

2014-01-04 14.19.052014-01-04 14.20.08 2014-01-04 15.11.25

2014-01-04 15.50.13 2014-01-04 15.11.322014-01-04 15.50.20

20140716_23121020140709_205952

 Step 3: Seat Cushion

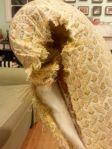
The seat cushions are filled with down, which I was super stoked about.  I washed them in my washing machine before sewing the cover them because who doesn’t love clean, fluffy down?  The cushions are soooooooooooooooooooo luxuriously comfortable.  I love them!

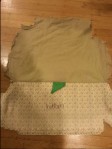
Whoever tackled this project before me gave up before finishing the cushion cover, so I didn’t have a perfect guide, but I improvised by looking at the general shape of the inside cover holding the down in.  There were 3 pieces: top, bottom, 1 side piece.  I traced half of the top piece to made a paper pattern so that both sides would be symmetrical as I flipped it over.  I also added a long zipper to make the cover removable for cleaning, which turned out to be a great idea as one of my kids smashed raspberries in it the day after I finished!
20140709_205937

(The cushion looks a little too big in this picture, but that’s just because it was a bit smooshed from being sat on.  When fluffed, it fits perfectly.)

Budget (per chair)

  • Fabric (Premier Prints Polka Dots Twill Storm) – $24
  • Tack remover – $2.40 (40% off $3.99)
  • Upholstery staples – $3.50
  • Pli-Grip – $3.70
  • Zipper – $3
  • Staple gun, thread, hot glue gun, glue – I had these already.

TOTAL: less than $40!


DIY Toddler Backpacks

June 16, 2014

I made backpacks for C&R!  It was the first thing I ever made with a pattern and it was shockingly easy.  Patterns are great!  I used this Made by Rae pattern and followed the directions almost exactly.

Since she sells her patterns, I won’t do a step by step here, but it really was very simple (other than the brief sewing machine torture I endured and wrote about here).

20140616_211607

20140616_211736

(And here are two not great photos of the lining – I couldn’t figure out how to photograph them unscrunchy.  Sorry!)

20140616_211629  20140616_211648

Two tips:

1. If you’re doing an applique, do it before you assemble the backpack.  I didn’t do that because I didn’t think about it beforehand and it was a pain in the butt.

2. When/if you sew the lining, measure your actual zipper area – don’t just follow the pattern.  For whatever reason, mine turned out a bit shorter than in the pattern, so I had to add a couple pieces of fabric after the fact to the lining to cover up the zipper area.  It’s barely noticeable, but save yourself the hassle.

Next time

I would add pockets with elastic on each side and also at least one on the inside.  I don’t think it would be hard to do, I just forgot to do it and didn’t want to disassemble the backpacks just to add the pockets.  Instead, I’m going to make a few small pouches for snacks, art supplies, etc for our upcoming trip.  I’ll post about those soon.


Even though I’d make some changes, I think these turned out pretty great for a first attempt and my boys seem to love them, especially R!

DSC_1243DSC_1240

DSC_1303